Workflow
Workflow for contributing to our Cookbook
Your workflow can be from whatever software you are most comfortable with: you can develop chapters working in an integrated development environment (IDE) like RStudio or VS Code, notebook interface like JupyterLab, or a text editor. You’ll develop content like you normally would, executing all code like you normally would as you develop your .ipynb , .md , .Rmd, and .qmd files. By default, when we build the Cookbook it will not execute code in Jupyter notebooks.
Then, when you’re ready to update your contribution in the Cookbook, Quarto will combine all the files to make the Cookbook (or other books like it!). Below is a full workflow but depending on how you’re contributing, you may have more focus on different parts of it.
Quickstart reference
Daily setup: get the latest!
Make sure you have a recent version of Quarto.
## check which branches exist, where you are, and pull recent from main branch
git branch
git checkout main
git pull

## create and switch to new branch
git checkout -b branch-name

## develop content: write prose in markdown, code in R and Python
## remember to render any .ipynb, .rmd, or .qmd files before pushing
quarto serve
quarto render # can also render single file

## commit changes
git add --all
git status
git commit -m "my commit message here"

## push changes
git push -u origin branch-name  # connect your branch to github.com and push

## create a pull request
## from GitHub.com, create a pull request and once it is merged, delete your branch

## delete branch
git checkout main         # switch to the main branch
git pull                  # pull merged updates from github.com
git branch -d branch-name # delete old local  branch
GitHub Workflow
First let’s talk about the GitHub part of the workflow.
We will work in branches so as to not overwrite each other’s work, and let GitHub do what it does best.
The main branch will be the current approved version of the book. The main branch is what displays at https://nasa-openscapes.github.io/earthdata-cloud-cookbook.
A nice clean workflow with branches is to consider them temporary. You pull the most recent from main, you create a branch locally, you make your edits, you commit regularly, you push regularly to github.com, and then you create a pull request for it to be merged into main, and when it’s approved the branch is deleted on github.com and you also delete it locally. That’s the workflow we’ll walk through here. A great resource on GitHub setup and collaboration is Happy Git with R, which includes fantastic background philosophy as well as bash commands for setup, workflows, and collaboration.
The following assumes you’ve completed the initial setup from the previous chapter.
Branch setup
First off, check what branch you’re on and pull the most recent edits from the main branch. If you need to switch branches, use git checkout. *Note: a new alternative to git checkout is git switch (see this blog); when you updated git consider using it here instead too.
git branch          # returns all local branches
git checkout main   # switch branch to main
git pull            # pull most recent from the main branch
If you are already on the main branch, git will tell you, and that’s fine.
(If you have any residual branches from before, you’ll likely want to start off by deleting them — assuming they were temporary and have been merged into github.com. You can delete a branch with git branch -d branch-name).
Next, create a new branch, then switch to that branch to work in. Below is a one-step approach for the two-step process of git branch branch-name then git checkout branch-name (read more).
git checkout -b branch-name # create and switch to new branchDevelop content
Time to edit and develop content, and run your Quarto Workflow – see specific instructions below. While you’re developing, you’ll want to frequently commit and push your changes.
Commit changes
You’ll commit your work regularly as you go, likely using the following, which commits all files you’ve affected within the Cookbook project:
git add --all
git commit -m "my commit message here"
From R Packages by Hadley Wickham:
A commit takes a snapshot of your code at a specified point in time. Using a Git commit is like using anchors and other protection when climbing. If you’re crossing a dangerous rock face you want to make sure you’ve used protection to catch you if you fall. Commits play a similar role: if you make a mistake, you can’t fall past the previous commit.
Here are more of Hadley’s suggested best practices.
Push changes
When you’re ready to push changes you’ve made in your branch, you’ll first need to connect it to github.com by pushing it “upstream” to the “origin repository” (-u below is short for --set-upstream):
git push -u origin branch-name # connect your branch to github.com and pushThe above is a one-time command to connect your local branch back to github.com. After you’ve pushed successfully the first time, then as you continue to commit, you’ll be able to push as normal:
git pushDelete your local changes
There are several ways to delete your local changes if you were playing around and want to reset. Here are a few:
Burn it all down - delete the whole repo that you have locally, and then reclone.
cd 2021-Cloud-Hackathon
rm -rf 2021-Cloud-Hackathon
Undo changes you’ve maybe saved or committed, but not pushed. This is less time and internet intensive (no new clone/download).
If you’ve got changes saved, but not yet staged, committed, or pushed, you’ll delete unstaged changes in the working directory with clean:
cd 2021-Cloud-Hackathon
git clean -df
git checkout -- .
Here is a whole blog on how to do this, with conceptual diagrams, command line code, and screenshots from RStudio. https://ohi-science.org/news/github-going-back-in-time
Update local branch with remote main branch
If while you’re working you would like to update your local your-branch with the most recent updates on the main branch on GitHub.com, there are several ways to do this.
checkouts and merge main
Git Update Local Branch with remote Master
git checkout main
git pull
git checkout your-branch
git merge main
fetch and merge origin/main
git checkout your-branch
git fetch
git merge origin/main
Pull Request
Now you’ve synced your work to github.com. It is currently online, in a separate branch from the main branch. Go to https://github.com/nasa-openscapes/earthdata-cloud-cookbook, find your branch, and do a pull request.
TODO: Let’s discuss our review process:
- Tag someone to review, (including you if it’s a quick fix?)
- Timeline
- Merging
When the pull request is merged, delete the branch on github.com. GitHub will prompt you with a button at the end of the merge.
Delete Branch
Once your pull request is merged and you’ve deleted the branch from github.com, then come back to your local setup and delete the branch locally:
git checkout main         # switch to the main branch
git pull                  # pull merged updates from github.com
git branch -d branch-name # delete old local  branch
Quarto Workflow
Now the fun part! Our overall workflow will be to serve the book at the beginning, develop/edit chapters as simple text files (.md/.qmd/.Rmd) or executable notebooks (.ipynb) that will all render into the book.
Quarto lets us easily convert between file types, so depending on how you prefer to work and how you’d like to interact with different audiences, we can go between formats as we wish. For example, we can converting an existing .ipynb to .qmd to collaborate during development, and then convert back to .ipynb files for our workshops. See quarto convert help for details.
As you work, you’ll follow our GitHub workflow above, committing regularly. Remember to execute code in your Jupyter notebook ( .ipynb file)as you’re working so that your changes will be be included in the Cookbook before pushing to github.com.
The following is to run Quarto from the command line in our JupyterHub; see quarto.org to see equivalents in RStudio. See also this video (TODO link) demonstrating this workflow.
Quarto preview
The thing to do first is to “preview” the Cookbook so that we can see what it looks like as we develop the chapters.
Run the following from your branch in your earthdata-cloud-cookbook directory from the command line:
quarto previewAnd after it is served, paste the url into your browser to see the development version of the Cookbook.
You can open another instance to continue working from the command line, including running other shell commands and rendering (see next). Launching your command line shell of choice will open a new instance.
Develop Cookbook Content
You can develop Cookbook chapters in the text editor, IDE, or notebook editor of your choice (i.e. see JupyterLab with Quarto).
RStudio IDE & Visual Editor
You can also use the RStudio IDE. It can be used as a simple text editor, but it can also interactively execute code in .qmd and .Rmd files too.
The RStudio IDE Visual Editor makes this experience feel like a cross between an interactive notebook and a Google Doc:
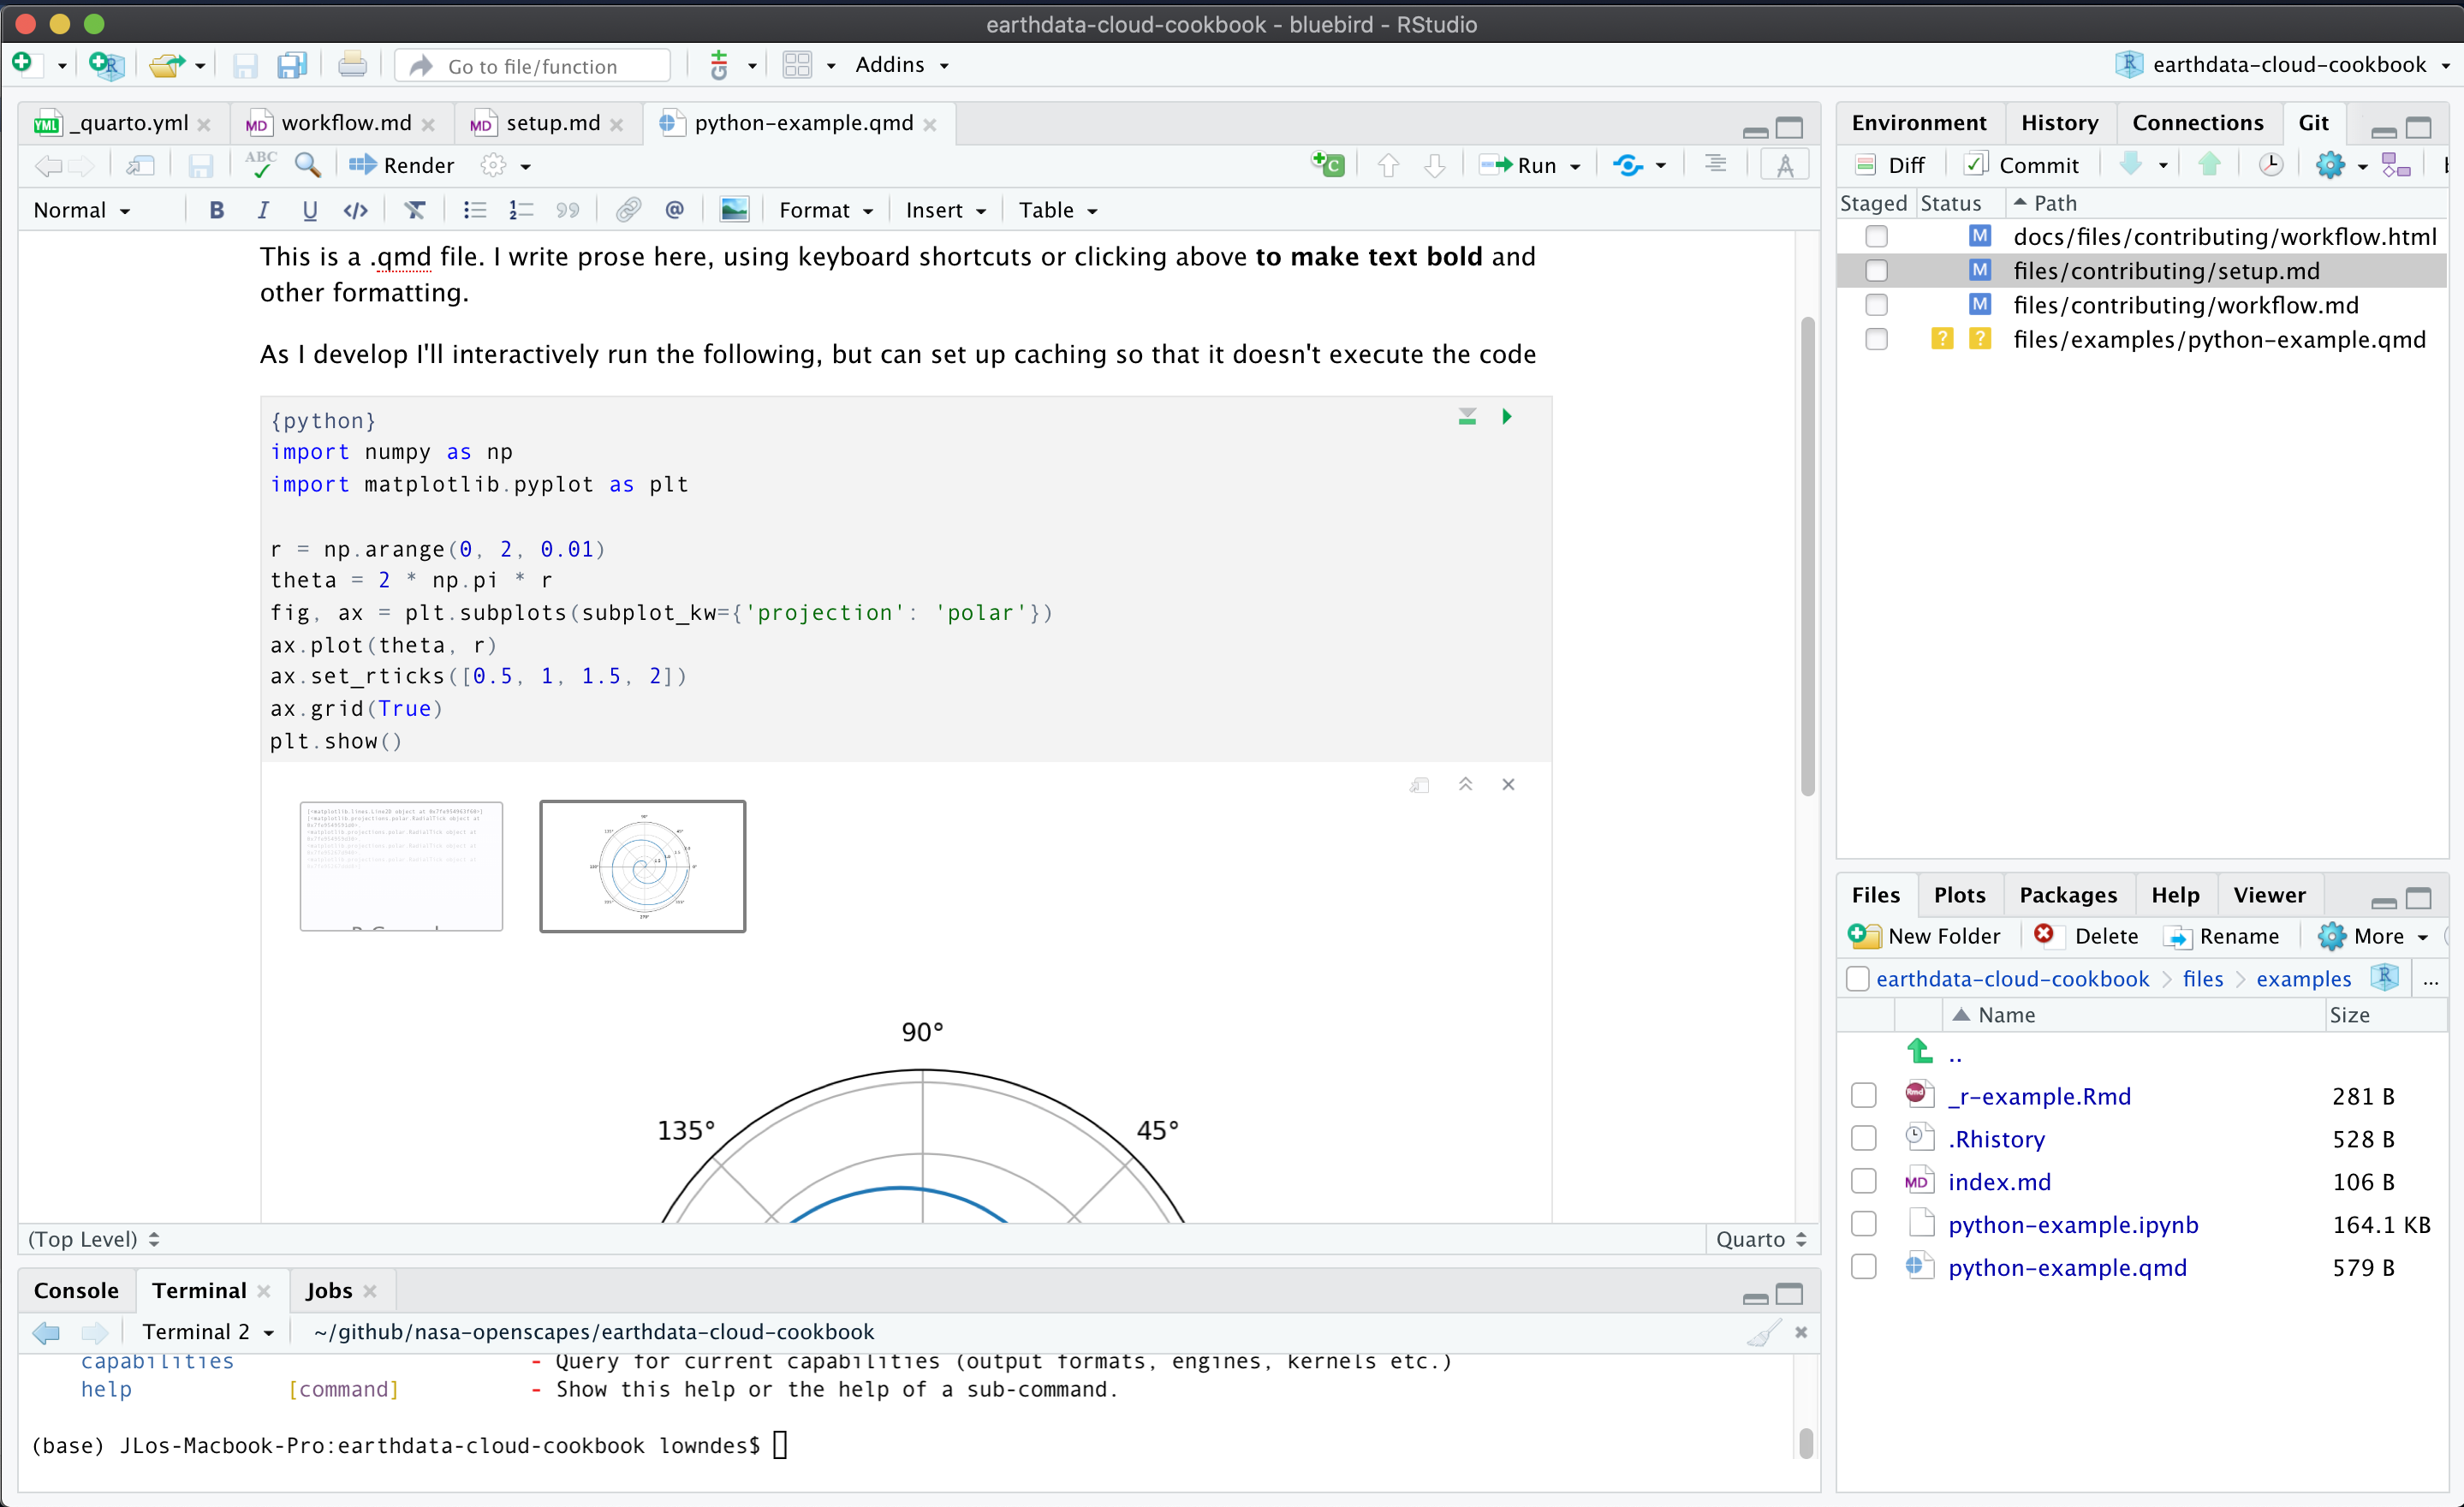
Above shows the Visual Editor in the top left pane with an interactive .qmd file. Learn more about the RStudio Visual Editor.
Another benefit of the RStudio IDE is that it has a docked command line (Terminal, bottom left pane), file navigation (bottom right pane) and GitHub interface (top right pane). The IDE helps keep things organized as you work, and provides a visual way to review your git commits and do common commands (see this RStudio-GitHub walk through from R for Excel Users). Note too that the image shows the second instance of the Terminal command line; the first is being used to serve Quarto.
Quarto render
As you develop book chapters and edit files, any .md files will automatically refresh in the browser (so long as quarto serve is running)!
To refresh files with executable code, you’ll need to render them individually. You can do the following to render .ipynb/.qmd/.Rmd files so that they show up refreshed in the served Cookbook.
quarto render my-document.ipynb      ## render a notebook
quarto render my-work.qmd            ## render a Quarto file
quarto render my-contribution.Rmd    ## render a RMarkdown file
From the RStudio IDE, you can also press the Render button to render .qmd and .Rmd files.
And you can also render the whole book:
quarto renderLearn more about rendering with Quarto. From J.J. Allaire:
The reason Quarto doesn’t render
.Rmdand.qmdon save is that render could (potentially) be very long running and that cost shouldn’t be imposed on you whenever you save. Here we are talking about the age old debate of whether computational markdown should be rendered on save when running a development server. Quarto currently doesn’t do this to give the user a choice between an expensive render and a cheap save.
Includes (re-use markdown)
We are setup with an includes filter (details at Quarto.org) that lets us re-use markdown content within a project! (You can think of this like “knit child” in R Markdown and lets you source text like you source scripts from each other). This means that we can write text more modularly and re-use it in multiple places so that it’s always up to date.
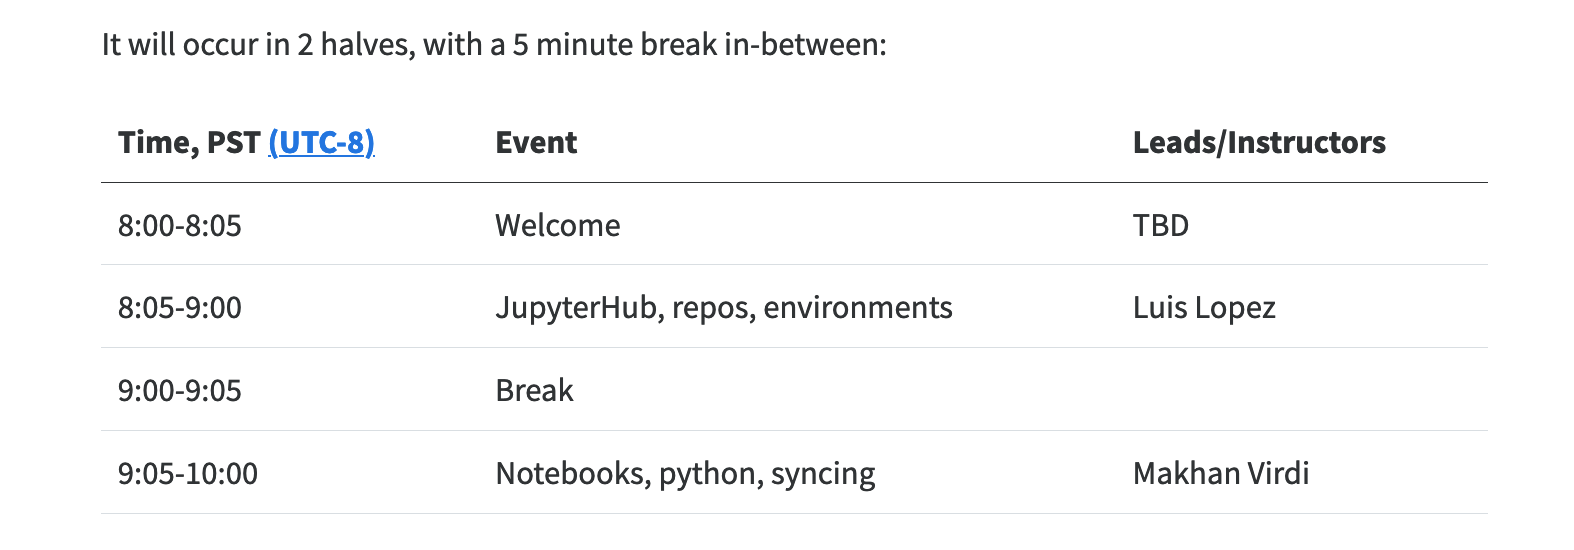
An example of this in action is in our 2021-Cloud-Hackathon Quarto book, where each day of the schedule is saved in a separate file:
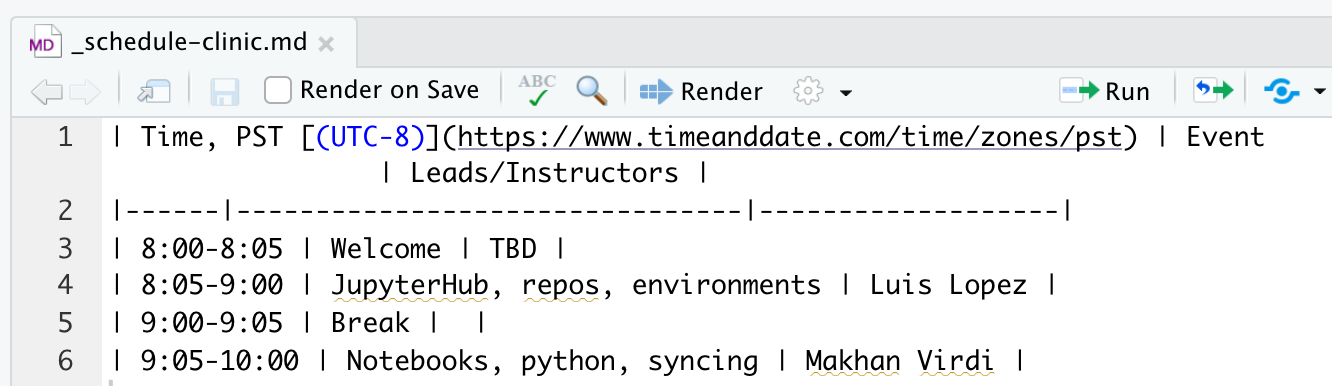
This is then called within a book chapter, with a relative filepath:
The Clinic will occur in 2 halves, with a 5 minute break in-between:

{.include}
../logistics/_schedule-clinic.md
…to finally look like so:
Includes - things to note
- prefix files to include with an underscore.
- From quarto.org: You should always use an underscore prefix with included files so that they are automatically ignored (i.e. not treated as standalone files) by a
quarto renderof your project.
- From quarto.org: You should always use an underscore prefix with included files so that they are automatically ignored (i.e. not treated as standalone files) by a
2i2c Workflow
We use 2i2c to run notebooks.
Log into 2i2c
Screenshots of logging in and starting a session are in Workshop Setup.
- Go to the openscapes 2i2c. You should see the openscapes 2i2c instance.
- Click on the orange “Log in to continue” button. You should see the Openscapes-Prod page.
- Click the “Sign in with Github” button and log in. If you aren’t already logged into Github, you should see the login prompt. Otherwise, you will be logged in automatically.
Start a 2i2c session
At this point, what you see depends on whether or not you have an active session. If your session is active, JupyterLab will load and you can start your work. If not, you’ll need to start a new session:
- Select a server based on the size of your job. You should see a progress window showing you what 2i2c is doing to get your session started. It may take several minutes, but you’ll eventually see a JupyterLab instance.
Create a Jupyter kernel to run notebooks
The default jupyter kernel may not have all the libraries you need to run a notebook. Fortunately, you can make a new kernel on the fly to use with the notebook.
Open a terminal in JupyterLab.
- Click on the large blue “+” button on the upper left. You should get a new Laucher tab.
- In the Launcher tab, click on “Terminal” under “Other.” You should get a tab with a command line prompt.
Create a conda environment using your favorite method.
Activate the new environment with
conda activate YOUR_ENVIRONMENT_HERE. You should see the name of the new environment in your command line prompt.Create a new kernel by calling
ipython kernel install --name YOUR_ENVIRONMENT_HERE --user. You should get a response saying saying the kernel has been installed.
To use this new kernel,
- Open the notebook you want to run. You should see the notebook in a tab.
- Click on the current kernel on the upper right. The default kernel is called
Python 3. You should see a kernel selection widget. - Select the new kernel you created and click the “Select” button. The kernel on the upper right should now give the name of your custom kernel.
Dockerfile
To update the Dockerfile, see corn’s README.
Virtual Environments
If you are working on a chapter that loads any Python or R packages, to make your work reproducible you’ll need to create and then update the environments.txt file. Do this use the pip freeze command:
pip freeze > requirements.txtThis will overwrite/update the requirements.txt file. Depending on where you are working, you might also want to create a new subfolder to store the requirements.txt. See the next section on Cookbook Structure.
You you will then commit and push along with your other edits back to github.com.
TODO: info about conda…
Cookbook Structure
Each chapter in our Cookbook is a separate file (.md/ .ipynb/.qmd/.Rmd).
The Cookbook structure (i.e. the order of sections and chapters) is determined in the _quarto.yml file in the root directory. We can shuffle chapter order by editing the _quarto.yml file, and and add new chapters by adding to the _quarto.yml and creating a new file in the appropriate sub-directory that is indicated in _quarto.yml.
Please experiment, add new chapters and sections; we can shuffle chapter order and subsections as we continue to develop the Cookbook, nothing is set in stone.
Cookbook Practices and Conventions
These are shared practices and conventions that we have for co-developing the Cookbook. With so many contributors, consistency can give us an implicit understanding of where to put something or how to name it, and save us time searching documentation. This will be developed further as we go!
Naming things and organizing them
These conventions aim to help us more quickly find files we want to edit or find where a notebook or new chapter fits best.
Each navbar item should have its own folder. Example: use
cheatsheets/index.qmdnotcheatsheets.qmd.Names of folders, files, and filepaths should match what we call them in the nav bar. What we call them in the nav bar is defined in the
_quarto.ymlfile.
Reorganizing: creating aliases and redirects
As we reorganize different chapters/pages in our Cookbook, inevitably we’ll break URLs that someone (maybe a researcher, maybe you!) has bookmarked. To prevent these broken links, we can use aliases. These are also sometimes called redirects.
The Quarto documentation is here: https://quarto.org/docs/websites/website-navigation.html#redirects
What this looks like:
---
title: How do I access data stored in Earthdata Cloud?
execute:
  eval: false
aliases:
  - working-with-data-in-cloud/Direct-Cloud-Access.html
  - working-with-data-in-cloud/Access-EULA-Data.html
---
As you work and render the Cookbook, notice the feedback Quarto gives you. When you see yellow text that says the following, this is a nice flag to you to include this as an alias.
WARNING: Unable to resolve link target: working-with-data-in-cloud/Direct-Cloud-Access.qmdThis warning is also a good indication for you to update any links within the Cookbook that point to this old page. In the RStudio IDE, you can go to Edit > Find in Files… to identify all the files in the Cookbook that have that link, and then you can do a search-replace to update them all at once.
_quarto.yml style
We use a 2-line style in our _quarto.yml file to define how a Cookbook page is named in the navbar (text) and to point to its source file (href) like this:
    - text: "Cheatsheets & Slides"
      href: cheatsheets/index.qmd
Note: What is defined in text as the navbar title will take precedence over the title that is written in the target file. This doesn’t change how the title appears on the Cookbook page itself.
The alternative style is 1 line:
- cheatsheets/index.qmdThis is perfectly functional, but we think that the more explicit 2-line style helps us all see what needs to be edited to make our contributions most visible.
Content for section landing pages
Each landing page for a section can be empty, or can have short paragraph saying what the section includes and “look at the navbar to see what’s here”. A full table of contents on the landing page is not necessary, but in some cases we might want to highlight key sections or provide extra explanation for what a user will find.
Example for Tutorials page: “Below are some specific tutorials spotlighted, with additional information. Please also see the navbar on the left for a full list”.
Why don’t we want / need full table of contents?: When someone contributes a new Tutorial by adding their notebook and pointing to it in the _quarto.yml file, it is immediately discoverable in the navbar. Having to add it to a list on the Tutorials landing page is an extra step that a contributor might not do so it’ll be less discoverable than if it only appeared in navbar.
Markdown formatting with Quarto
Quarto expects a certain “flavor of Markdown”, which means there are a few things we should be aware of with any Markdown in notebooks:
Avoid --- as Markdown breaks because it is confused with yaml headers and will stop displaying your notebook. Instead, use *** to make any line breaks.
Put a carriage return before lists
This will avoid the following, when ipynb can display the list correctly with no carriage return but quarto does not.

Executing notebooks
As you develop files with executable code ( .qmd, .Rmd, and .ipynb), you can decide if you don’t want the notebook to execute. By adding YAML as a raw text cell at the top of an .ipynb file, you can control whether it is executed or not. Adding execute: false to the YAML at the top of the file basically means that Quarto never runs the code, but the user of course still can interactively in Jupyter.
Using .qmd there are also ways to control execution cell-by-cell via # | syntax within a code chunk; see https://quarto.org/docs/computations/execution-options.html
Quarto (non)executable syntax
Code chunks are executed if they are within curly brackets like {python}. If we don’t want code in a .qmd or .Rmd file to be executed, we use the syntax:

This is required even if the YAML at the top of the file has execute: false.
There are actually two ways for computational code to be ignored. There are merits for each -
```{.python}This {.python} syntax has the consistency of the { } notation.
```pythonThis python syntax is cleaner and follows these rules:
- Brackets = computation
- No brackets = static code (Thus no dot notation)
We’ve chosen to go with this second option, where brackets = computation.
Importing remote notebooks
We can include remote notebooks in the Cookbook by explicitly importing them with the following steps. This will create a local copy of them that have additional preamble inserted that includes the original urls and attribution for the notebook.
Navigate to the
_importdirectory.Open
assets.jsonin a text editor. Copy an existing example and use the same structure to indicate the remote notebook you’d like to include. You can write Markdown in the preamble.title: this will be the new title of the notebook
preamble: this text will be inserted into the notebook below the new title. It should include any description and attribution of the notebook. The preamble is followed by two URL fields (next):
source: the url landing page. This should be more general than the specific notebook (i.e. this could be the root GitHub repository).
url: the url of the notebook. (i.e. a url that ends with .
ipynb)target: the local filename to give the notebook. The notebook will be saved in the
externalfolder in the root directory.process: true or false: whether or not to include the entire entry when running the
quarto_import.pyscript
After these updates to _import/assets.json, do the following in the terminal:
cd _import
conda env update -f environment.yml
conda activate quarto-import
python quarto_import.py -f assets.json
This will return a confirmation of the file that has been processed.
Then update _quarto.yml by adding your file (external/<target) to the appropriate location in the Cookbook.
Create a .qmd from external .ipynb
This is a bit of a hacky way that we can formalize further if it’s useful:
- Go to an existing notebook, e.g. https://github.com/podaac/AGU-2020/blob/main/Part-II/01_sst_shpfile/AGU_tutorial1_shp_search.ipynb
- Click on Raw, e.g. https://raw.githubusercontent.com/podaac/AGU-2020/main/Part-II/01_sst_shpfile/AGU_tutorial1_shp_search.ipynb
- Copy text
- In your local setup (e.g. RStudio IDE): New File > Text File > Paste > Save (with the same name if appropriate) and
.ipynbextension, e.g.:discovery/search-by-shapefile.ipynb - In the command line:
#| eval: false
quarto convert help # reminder of commands!
quarto convert discovery/search-by-shapefile.ipynb # convert to .qmd
rm discovery/search-by-shapefile.ipynb # delete .ipynb
Cookbook Editing
TODO Add these sections
Fix a typo
Edit a chapter
Add a chapter
Scenario: you’ve got a notebook you’d like to bring into the Cookbook. We’ll use GitHub. Screenshots below are from the JupyterHub, though you could also do this in RStudio, VSCode or your IDE of choice.
Create a branch
In the earthdata-cloud-cookbook repository, create a branch. As a reminder, you’ll need to have cloned the cookbook repo, and set up a new branch.
Add your notebook into a Cookbook folder
You’ll need to choose a place to add your chapter. For now, if it’s a tutorial, add it to the Tutorials chapter. During review it may be moved to a more suitable location in the Cookbook.
You can do this by dragging your notebook into the tutorials folder in your branch
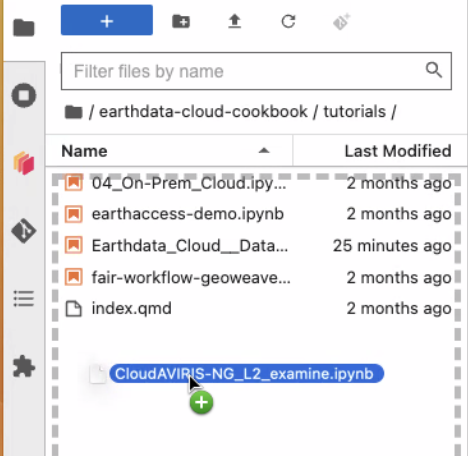
or by clicking the upload button (near the big blue button)

Open the notebook and browse it to confirm that it looks the way you expect it to and that images all all present. If images are not showing up, you might need to sleuth to find the image names (click in the notebook in the hub to view the source). Below is a screenshot exploring this.
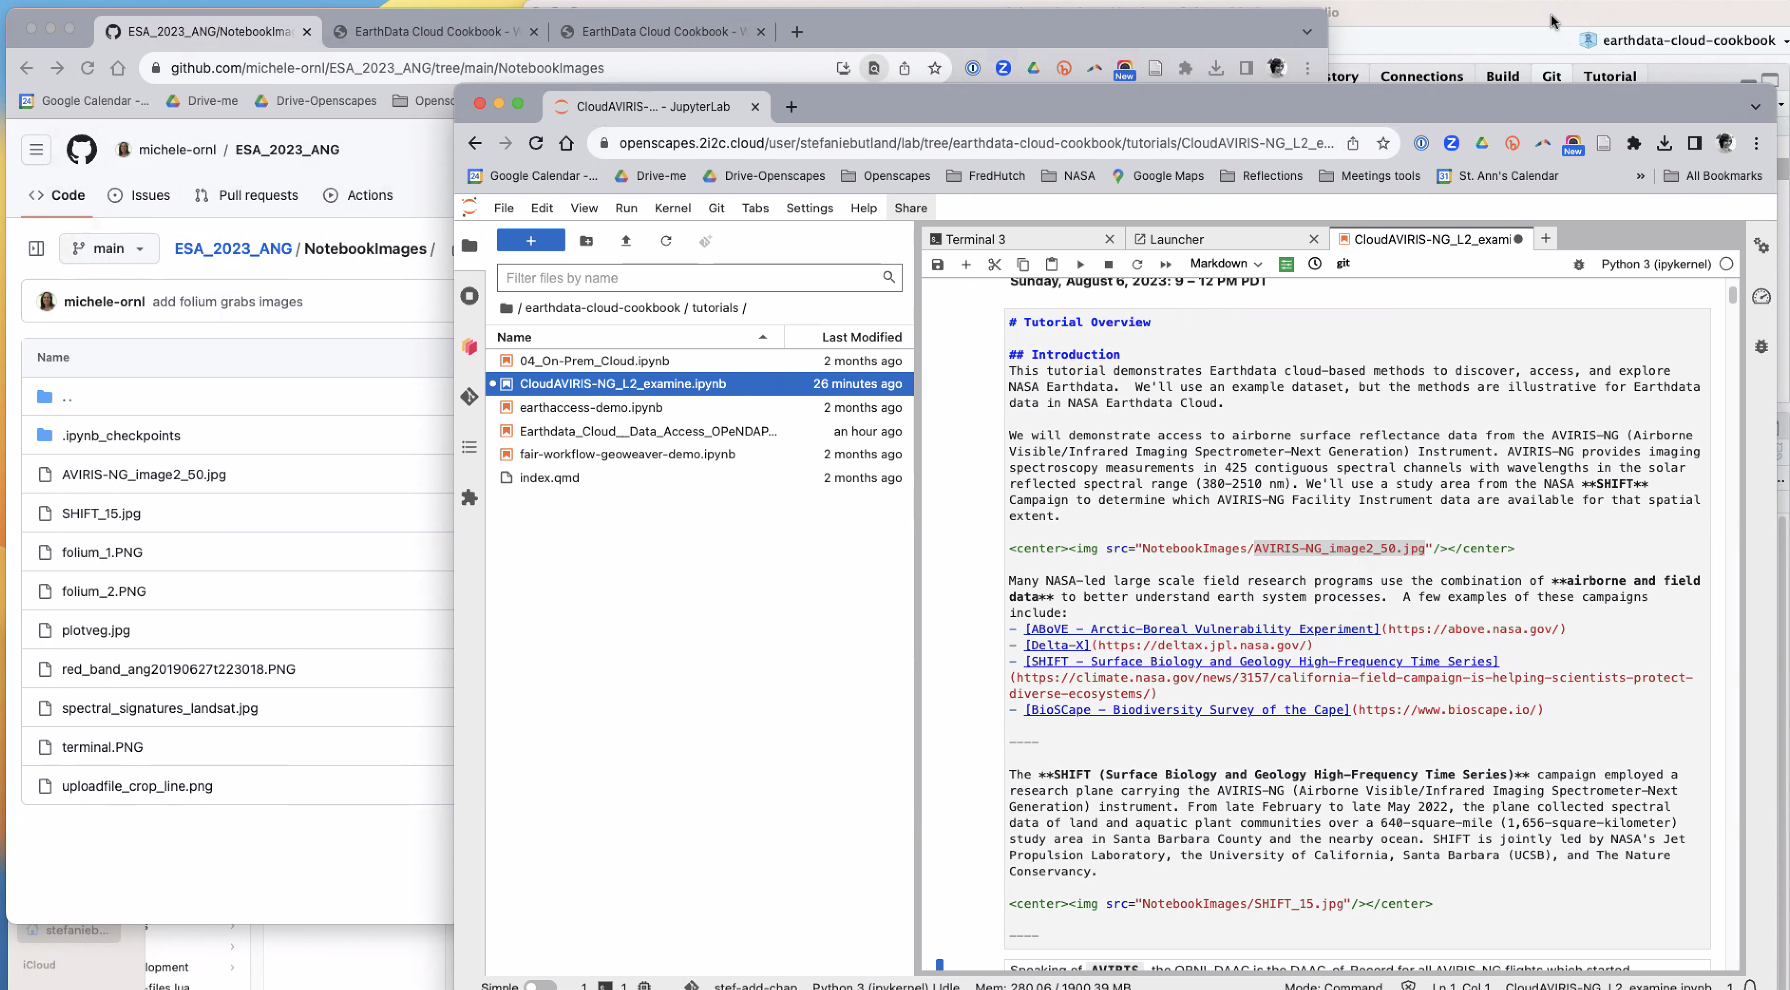
We noticed when browsing this notebook example, it is missing some of its components. Our goal is to be able to import a complete functional notebook into the Cookbook with a minimal number of steps.
TODO: complete the import of images, and the following bullets:
- quarto render notebook
- quarto preview notebook
- commit and push to your branch
- create a PR and ask for a reviewer
Review a pull request
Any pull request (PR) must be reviewed before it can be merged into the Cookbook. If you know someone who is familiar with the content you’re proposing to add, request their review.
The following notes are adapted from a coworking session in which Amy Steiker and Julie Lowndes reviewed a Cookbook pull request from Andy Barrett. (video, 19 min). Some generic mechanics of reviewing a pull request in GitHub are demonstrated in a screenshare (video, 7 min 41 sec).
In reviewing a pull request with lots of changes, it can be helpful to have windows open to view both the GitHub browser and the 2i2c Hub showing the Cookbook preview.
From the pull request page in GitHub browser, look at the elements of the pull request.

- Start with Conversation tab:
- We can see all commits and comments on what Andy has worked on
- This is where we can add PR reviewers by clicking the gear icon next to “Reviewers” at the top right corner of this tab.
- Commit tab:
- More details on the commits that we saw under Conversation. When we click on one of the commits, we can see line by line what has changed under that commit (green lines are added, red lines have been removed)
- Files Changed tab:
- Often easier here to assess all the files that changed across the commits
- In Nav bar: Orange dot box signifies modified; Green plus box means something’s been added; Red minus box means deleted; Grey arrow box means renamed.
- Checks tab:
- Shows status of the Github Action that renders and deploys the Cookbook. We can know whether this PR has the ability to be deployed
Now, switch to the 2i2c Hub to view the Cookbook preview as it would appear if the pull request was merged:
- Terminal:
- Go to the Main branch and pull so that we have the most recent changes from remote.
git checkoutto the branch that has the PR: reorg_how_to_guides (note, this PR has been merged and the branch deleted so you won’t see this one; apply this example to your own)quarto preview- this will build the book with Andy’s suggested edits.
We can now view the changes in the built Quarto book and concurrently look at the files changed in GitHub.
- Now we see a minor issue with capitalization in the
how-tos/subset/index.mdfile:- In GitHub under the “Files changed” tab of the PR, we can add a suggested edit by clicking the “plus” button below the line in question. (See minute 17:04 in the video for the mechanics of this. Suggesting specific commits can speed the contributor’s workflow compared with trying to describe what we’d like them to change.)
- We can click “Start a review” button so that Andy gets a single email when we’re done reviewing, rather than getting one notification for every edit we suggest.
- We can check the “Viewed” box on each file as we go through them in the Hub. Marking files as viewed can help track our review progress by minimizing the changes visible, but does not affect the review.
We will review each individual .md file and can come back to the main _quarto.yml if we see an issue with the main navigation.
Once our review is complete, we add a note in the GitHub review and click “Approve”, “Comment” or “Request changes”. In the note it can be really helpful to add a note of appreciation for some aspect of the contribution, tagging the submitter, saying they can merge the PR after making changes, and possibly add a summary of our requested edits including the number of changes requested. Some changes in the middle of a long list of edits can be marked as hidden conversations, so this can be helpful to the submitter to know they’ve seen everything.
Notebook Review
Preamble
GitHub displays differences in code, so a nice way to review other people’s work (or your own) is to edit files directly and view the commit differences at GitHub. We’ll do this by first creating a branch and pull request so that that there is a chance for the original author to be notified of the suggestions and review them before merging back to the main branch (at which point the quarto book/site will be rebuilt since we have a GitHub action setup to do so).
GitHub can have trouble with .ipynb notebooks; their differences include file-formatting changes and are often too big to display. See examples: CMR notebook with file-formatting diffs and the CMR-STAC API notebook review with diffs too big to display. This means that while you can still edit it directly, it’s hard to alert the author to what changes you made. Some emerging conventions to help with this:
- write
TODOfor “to do’s”, but this as one word all-caps makes it easier to search
Review with .qmds
Since quarto notebook files (.qmds) are text files, GitHub can display their differences nicely, for example: CMR-STAC API qmd.
Here is a workflow to leverage .qmds in our review process:
- Clone/pull the repo, create a branch following our GitHub Workflow above
## git clone and branch
git clone https://github.com/NASA-Openscapes/2021-Cloud-Hackathon/
git checkout -b my-new-branch- In the terminal, use
quarto convertto convert a notebook from.ipynbto.qmd. You’ll have to eithercdinto the folder or you can convert by specifying the filepath. Typingquarto convert helpwill describe more options. The following will createtutorials/Data_Discovery__CMR-STAC_API.qmd.
## quarto convert
quarto convert tutorials/Data_Discovery__CMR-STAC_API.ipynb
Commit this file now so that the whole file is tracked and any changes you make will be viewed as diffs.
Now, make edits/review the
.qmdin your editor of choice, which will likely also have spell-check and markdown support. At the moment, this is best with making edits to the.qmdlocally while ALSO running the.ipynbnotebook in 2i2c. This will iterate as we get quarto set up in 2i2c (and as we work more with.qmds).When you’re done with your review, you’ll want to copy all your edits from the
.qmdback to the.ipynb. This way, the notebook author can both easily see the diffs made to the.qmd, and run the.ipynbas they normally would in 2i2c. The following code createstutorials/Data_Discovery__CMR-STAC_API.ipynb, and over-write the original.ipynbwith your changes.
quarto convert tutorials/Data_Discovery__CMR-STAC_API.qmd Quarto will consider the
.qmdbook chapter and try to render it. To avoid this, by hand you can prefix the filename with an underscore: before you push:_Data_Discovery__CMR-STAC_API.qmd(do this by hand for now, we’ll iterate further)Finally, commit and push your review!
Code Review
Upcoming.
Troubleshooting
Error: AddrInUse
ERROR: AddrInUse: Address already in use (os error 48)
This error is because you had more than one instance of quarto serve going in your session. So close other command line instances that are running and try again. (If you use the R package and do quarto_serve() it will automatically make sure you only ever have 1 instance.)
Leave/exit a virtual environment
In your Command Line Shell, if you want to leave your virtual environment, the command is:
deactivateThe way you tell that you are in a virtual environment: it’s named in parentheses at the beginning of your prompt:
(.venv) (base) JLos-Macbook-Pro:earthdata-cloud-cookbook lowndes$ deactivate
(base) JLos-Macbook-Pro:earthdata-cloud-cookbook lowndes$